Ace Fleet Software
User Manual
Contents
1.2. Create Version of Existing Quote
1.5. Perform Rate Group and Postal Code Search
1.8. Re-order the Record Numbering
2.1. Fleet Premium Entered Is Overwritten
2.2. Fleet Modifier Other Than Unity
2.5. Vehicle List With Zero Premiums
2.6. Increasing Limits Decreases Modifier
2.7. Fleet Summary And Optional AB
2.10. Insured Popup Cannot Select And Close
2.11. Frozen Quote Can Be Copied
2.13. Horizontal Scrollbar Missing
2.14. Discount Surcharge Premium Not Shown
2.15. Cannot Transfer High Rate Groups
2.16. Fleet Premium Tab Not Visible
2.18. Quotes Versus Policy Number
2.21. No Login Popup at Startup
2.22. Vehicle Schedule Small Font Printout
1. How To …
1.1. Create Quote
· At the “Input” tab click the “Quote Management” button OR the “Quote Management” icon (picture of hammer and screwdriver) OR the menu bar Tools -> Quote Management.
· At the Quote Management popup (Section 16.5) select the “New” option (Section 16.5.11). Select the version in the version dropdown, select “new” in the Quote dropdown. Then select the desired limit and group in the corresponding dropdowns. Enter the underwriter name. Click the “Select Insured” button.
· At the Select Insured popup (Section 16.5.12) click on an existing record in the list provided or add a new insured to the list and then click the record containing the recently added new insured.
· A record entry will be added for this new quote in the Submission Log.
1.2. Create Version of Existing Quote
· At the “Input” tab click the “Quote Management” button OR the “Quote Management” icon (picture of hammer and screwdriver) OR the menu bar Tools -> Quote Management.
· At the Quote Management popup (Section 16.5) select the “Copy” option (Section16.5.10). Select the version and quote number for the source quote from which information will be copied. Select the version for the target quote. Select “new” for the quote. Then select the desired limit and group in the corresponding dropdowns. Enter the underwriter name. Click the “Select Insured” button.
· At the Select Insured popup (Section 16.5.12) click on an existing record in the list provided for the same insured as the source quote. Click “Select & Close”. The Quote Management popup will have “Quote Number” and “Client Name” populated. The “Quote Number” in the target quote will indicate a version number one higher than that in the source quote.
· A record entry will be added for this new quote in the Submission Log.
1.3. Copy Existing Quote Data
· At the “Input” tab click the “Quote Management” button OR the “Quote Management” icon (picture of hammer and screwdriver) OR the menu bar Tools -> Quote Management.
· At the Quote Management popup (Section 16.5) select the “Copy” option (Section16.5.10). Select the version and quote number for the source quote from which information will be copied. Select the version and quote number for the target quote to which information will be copied.
· Specify whether Premiums, Exposure and Claims information need to copied and if the Claims information needs to be aged. Select “Recalc Premium” so manual premium are re-calculated for each record and coverage.
· A record entry will be added for this new quote in the Submission Log.
1.4. Renew Existing Quote
· At the “Input” tab click the “Quote Management” button OR the “Quote Management” icon (picture of hammer and screwdriver) OR the menu bar Tools -> Quote Management.
· At the Quote Management popup (Section 16.5) select the “Renew” option (Section16.5.10). Select the version and quote number for the source quote to be renewed. Only quotes that have been previously issued, renewed or endorse can be renewed.
· Clicking the Process button will generate an exact duplicate of the source quote except that the effective and expiry dates will be aged by one year. Also any claims will have their claim period advance by one period year.
· A record entry will be added for this new quote in the Submission Log.
1.5. Perform Rate Group and Postal Code Search
· At the “Input” tab after selecting a quote, click the “RG Search” button OR the “RG Search” icon (picture of magnifying glass) OR the menu bar Tools -> RG Search.
· At the RG Search popup (Section 14.3.416.5) select the Rate Group table to search (or the Postal Code table to search). Select the version and all others dropdown boxes that appear. Once the search result box is shown, click the “Transfer Rate Group” button to populate the visible rate group (or Rating Territory) dropdown boxes showing on the “Input Vehicle” tab. Note for VIN search the search result appears after 12 digits are entered in the text box, however the user can enter additional digits for recording purposes without any impact to the search result box.
· The results of a VIN search will provide also the IBC code and year in addition to the make and model. If a Commercial Rate Group table is present, the user has option to display to display the corresponding Rate Group under the Commercial Rate Group table base upon the IBC code and year.
1.6. Create Vehicle List
· To show the Vehicle List popup, click the “Vehicle List” icon (picture of check marked line paper) OR the menu bar Tools -> Vehicle List.
· At the Vehicle List popup (Section 15.116.5) Select the desired quote. Keep the default entries.
· A valid Vehicle List is created once the user has entered 1) all the required records in the “Manual Premium” tab using the “Input Vehicle” tab, 2) entered the claim information in the “Clams History” tab, 3) entered the exposure information in the “Exposure History” tab, and 4) entered the desired fleet modifier in the “Fleet Premium” tab.
1.7. Create Fleet Summary
· To show the Fleet Summary popup, click the “Fleet Summary” icon (picture of starred paper) OR the menu bar Tools -> Fleet Summary.
· At the Fleet Summary popup (Section 15.315.116.5) Select the desired quote. Keep the default entries.
· A valid Fleet Summary is created once the user has entered 1) all the required records in the “Manual Premium” tab using the “Input Vehicle” tab, 2) entered the claim information in the “Clams History” tab, 3) entered the exposure information in the “Exposure History” tab, and 4) entered the desired fleet modifier in the “Fleet Premium” tab.
1.8. Re-order the Record Numbering
· At the “Input” tab click the “Quote Management” button OR the “Quote Management” icon (picture of hammer and screwdriver) OR the menu bar Tools -> Quote Management.
· At the Quote Management popup (Section 16.5) select the “Reorder” option. Select the version and quote number for the target quote for which the Record Numbering will be sequenced starting from 1.
1.9. View Data In Excel
· At the “Input” tab click the “Quote Management” button OR the “Quote Management” icon (picture of hammer and screwdriver) OR the menu bar Tools -> Quote Management.
· At the Quote Management popup (Section 16.5) select 1) the “Output” option. Select the version and quote number for the target quote for which an xml file representing all the data associated with the quote. Select 2) “Dump” to create an xml file representing all the data associated with all the quotes in the database.
· Open Excel 2007 or later. Goto Developer tab -> Import and select the file previously output and answer the dialog questions. All tables such as premium and claims will be shown in a single Excel sheet. User can now extract the desired information.
· Alternatively, user can copy all the records in the “Manual Premium” tab or “Fleet Premium” tab (CTRL-C) and paste (CTRL-V) into an Excel sheet.
2. F.A.Q.
2.1. Fleet Premium Entered Is Overwritten
Q. Why does the Fleet Premium entered for a coverage gets overwritten by a slightly different amount?
R. The fleet premium entered for a given coverage is used to calculate the final modifier which is applied to the coverage premium for each record. The coverage is premium is rounded to the nearest dollar and total over all records is added and overwrites the fleet premium entered. There may be a slight difference in the user entered amount and the calculated total due to rounding
2.2. Fleet Modifier Other Than Unity
Q. Why is the fleet modifier other than unity for optional Accident Benefits and Endorsement premium?
R. The fleet modifiers for these coverages reflect only expense credit and commission adjustment while all other coverages also reflect the experience modifier and scoring modifier.
2.3. Restore Record
Q. I have accidently deleted a record. How can I restore the record?
R. Unfortunately there is no undo feature built into the software at this time. Nevertheless you can request the software administrator to perform a recovery of the fleet policy from the latest available backup performed on the database.
2.4. Vehicle List Blank Lines
Q. Why is the Vehicle List showing a blank line between adjacent records?
R. There is a record in the list which requires two line to display all its information. All records in the list are allocated the same number of row to display.
2.5. Vehicle List With Zero Premiums
Q. Why is the Vehicle List showing zero dollar premiums?
R. As per section 1.6 a valid vehicle list is created once the user has selected the final fleet modifier in the “Fleet Premium” tab.
2.6. Increasing Limits Decreases Modifier
Q. Why is the indicated fleet modifier less severe for the policy after the policy limits are increased?
R. The software assigns greater credibility to the experience at basic limit relative to the excess layer. Give more weighted to the tempered change applicable to the excess layer resulting a tempered overall fleet modifier.
2.7. Fleet Summary And Optional AB
Q. In the Fleet Summary popup where is the optional Accident Benefits premium?
R. The optional Accident Benefits premium is included in the endorsement premium.
2.8. Missing Quote
Q. I just created a quote yesterday but today I cannot find it in the quote dropdown box of the Input Vehicle tab?
R. A likely reason is the new rates have been loaded and the quote dropdown box show the quote associated with the latest version. Other reasons maybe that some has deleted the quote or change the grouping for the quote or hidden the quote. Please contact your software administrator to investigate.
2.9. Change Policy Limits
Q. I created a quote but I cannot change the policy limits?
R. The policy limits can only be changed if there are currently no records in the “Manual Premium” tab. Delete all records and then you can change the policy limits.
2.10. Insured Popup Cannot Select And Close
Q. In the Insured popup, I have filled-in all the fields but I cannot “Select and Close”?
R. In such an instance the list of matching records is blank. Click Add to add the insured to the insured list then select the new entered record and then click “Select and Close”.
2.11. Frozen Quote Can Be Copied
Q. Can a frozen quote be copied?
R. Yes a frozen quote that is not currently locked can be copied.
2.12. Lowest Fleet Modifier
Q. What is lowest fleet premium that can be generated for a quote?
R. If the software has been built with a constraint of maximum credit of 25% on experience, scoring and underwriter adjustment the easiest way to determine the lowest possible fleet premium is to go to the “Fleet Premium” tab and enter 0 for the final modifier change in the totals column. The system will overwrite the entry with lowest possible final modifier change.
2.13. Horizontal Scrollbar Missing
Q. Why isn’t the horizontal scrollbar in the “Manual Premium” tab not showing?
R. Place mouse over the tab of the “Manual Premium” tab and right click. In the popup click Float. Then right click over tab and then click dock.
2.14. Discount Surcharge Premium Not Shown
Q. Why isn’t the Discount or Surcharge premium shown in the “Input Vehicle” tab similar to that done for Endorsement and Optional Accident Benefits?
R. Discount and Surcharge are included in the algorithm to formulate the by coverage premium, similar to Class and Driving Record. Thus it would not meaningful separate out the specific discount and surcharge premiums.
2.15. Cannot Transfer High Rate Groups
Q. Why cannot I transfer the Rate Group shown in the search result of the Rate Group Search popup?
R. The company has filed rate group number and their relativities up to a specific value. Thus it is not possible to transfer and populate in rate group dropdown in the “Input Vehicle” tab rate group number larger than that filed.
2.16. Fleet Premium Tab Not Visible
Q. Why is the “Fleet Premium” tab visible by default at the start of the software?
R. By default the “Fleet Premium” tab is kept hidden to increase speed in which the software performs any calculation. Otherwise any use input cause the fleet premium to be re-calculated in the background slowing the software performance.
2.17. Hide Tabs
Q. Can I hide any or all of the tabs?
R. Yes you can hide any or all of the tabs by clicking the little ‘x: in the tab right after the tab name. To unhide tabs go to the menu bar Windows and select the tab you want to unhide.
2.18. Quotes Versus Policy Number
Q. The software creates quotes. Where does one enter the policy number once the quote is bound?
R. The policy number can be entered in the “Exposure History” tab, the Vehicle List popup or the Rating Sheet popup.
2.19. IRCA Versus COM Fleet
Q. What is the difference between IRCA and COM Fleet shown in the Vehicle dropdown box of “Input Vehicle” and “Claims History” tabs?
R. The premium generated from IRCA and COM Fleet are exactly the same given the same rating characteristics are used to generated the premium. However COM Fleet rating characteristics have been extended for deductible which go beyond the deductible list provided for IRCA.
·
2.20. What IS MSL
Q. What is the purpose of MSL?
R. MSL stand for Maximum Single Loss. One single loss at MSL given the total loss occurrence is at the expected level, such a loss will generate a 25% debit over the manual premium calculated. In general a fleet policy with a large premium will have a higher MSL in order for such a loss at MSL to generate a 25% debit over the manual premium. The MSL is shown in the “Claims History” tab for each claims record. If the claims figure is entered as a bulk amount representing multiple claims the user is advised to cap individual losses at the MSL before totaling all the claim amounts for entry otherwise the software will cap the average claim amount to the MSL.
2.21. No Login Popup at Startup
Q. At software start-up the Login popup does not appear?
R. The user can generate the popup manually by clicking the Login menu item in the File menu-bar.
2.22. Vehicle Schedule Small Font Printout
Q. Printing the Vehicle Schedule popup produces exhibits in which the font is very small. Also if printing to Legal landscape a lot the print space is not utilized.
R. To maximize the font of the any exhibit the shape of exhibit display should have similar proportions as the target print output. For example to print to Legal Landscape, horizontal stretch or condense the popup so all characters are visible with little gap between column exhibits. Then vertically condense the popup so that the width and height proportions of the popup are similar to the Legal Landscape proportion. Once this is accomplished the user can then print the popup. In addition to increase the size of the printout the user can reduce the margins on the printout.
2.23. No Policies to Renew
Q. In the Quote Management Tool, upon selecting Renew, Endorse or Cancel option, no quotes appear in the dropdown.
R. One can only Renew, Endorse or Cancel quotes that have been previously Issued or Renewed.
3. Introduction
The Ace fleet rating software allows for the management of fleet quotes and their premiums. The fleet software is a must have tool for commercial property and liability insurers who need to provide fleet insurance to their insureds. Some features of the fleet software:
- The fleet software allows quotes to be added, populated, deleted, copied, rerated, exported, imported and accessed from any online PC.
- The fleet software is downloaded from the web while the policy data is stored on the web for easy access from any PC. Policy data can be placed on secured-access external servers or can be customized to be placed on the insurer's intranet.
- The fleet software can be customized and integrated in the insurer's policy management system.
- The fleet software calculates the manual premium and the fleet-rated premium. The software uses rating factors provided by clients and user provided information on fleet rating characteristics, claims and exposure history to generate fleet-rated premiums.
- The fleet software employs secure communication to central database. Encrypted passwords are transported and validated against stored encrypted passwords. In addition all data is transported using protocol HTTPS or SSL.
4. Download
The Ace Fleet Software can be downloaded from the web either from the internet or the licensed company’s intranet.
Please contact your software administrator for the exact web address.
A fully functional trial software has been placed at fleetratingsoftware.com which will allows users to familiarize themselves with the software feature using sample rates and factors.
The software has been developed to work under windows o/s.
Users have the choice of downloading one of three files.
1) Installer executable – download a single file with exe extension.
2) Installer excecutable.zip - download a single file in which a single file with exe extension has been zipped. This may be useful in case the policy settings of the user’s pc does not allow for the download of files with exe or msi extension.
In most browsers all the files will be downloaded to your file-system download folder and will have to be clicked again for program to begin. In case clicking the link causes a webpage with meaningless text to be displayed, the user needs to download the zip file.
If downloaded file is the zip file, extract the file inside to get the single file with exe extension. Click the single file with extension exe to install the program. After installation, click the file called fleet.exe to start the program.

5. Overview
One of the purposes of the fleet software is to determine the fleet premium for a fleet of vehicles. The fleet premium is the product of the manual premium and the fleet modifier. The manual premium is based upon the company specific base rates and factors. The fleet modifier is derived based upon the users’ input of historical incurred loss and exposure experience. The fleet modifier reflects the historical experience to the extent it is credible.
To accomplish derivation of the fleet premium, the fleet software is broken up into tabs in which user can input data. The historical incurred loss are input in the “Claims History” tab, historical exposure count is placed in the “Exposure History” tab. Vehicle characteristics are put in the “Input Vehicle” tab. The calculated premium shown in the “Manual Premium” tab is based upon these vehicle characteristics input in “Input Vehicle” tab. The fleet software uses the manual premium along with the historical experience input to calculate the fleet modifier and fleet premium, the results of which is shown in the “Fleet Premium” tab. The fleet premium dollar amount can be overwritten if desired by the user either by entering a new dollar amount or entering a percentage change to apply to the indicated modifier to generate the fleet premium.
In addition, various tools are available that allow the user to manage the quotes created and to select the rate groups and driving record number. Once quotes have been created, user may quickly generate reports on select quotes. See section 14.2 and 14.3 for documentation on all the reports and tools in this software.
Another purpose of the fleet software is to determine the individually rated vehicle premium using filed and approved rates. These premiums are one of the inputs for the fleet premium calculation and are shown in the “Manual Premium” tab.
The fleet software stores no data on the user pc. All data is stored in the central data server. Access to the central data may be restricted due to firewall policy imposed on the user machine or if the server is down for maintenance or if there is general internet outage. You may experience a significant lag after performing some operations as the data is routed over the internet and is subject to internet traffic bottleneck.
6. Start up & Logon
If you have downloaded the installer go to the program folder marked “fleet” and click the “fleet.exe” icon or the click the “fleet” icon placed on your desktop. Alternatively if you have installed “fleetx” then you need to click the “fleetx” icon.
Upon starting up the software the following screen will be visible:
Figure 1
Enter the provided name and password to logon.
6.1. Locking Quote
After logging on, the user can then select or create a quote. Selecting a quote locks the quote. No other user can access the quote. If the user does not use the software for 10 minutes, the user is logged off, all tabs are cleared, the quote is unlocked and the logon popup appears for the user to authenticate oneself again. Once the user is logged off the user will NOT have access to any Reports and Tools until they log back on. After the user has finished working on a quote the user can unlock the quote for others to use. Either the user can log off or can select another quote or can select no quote by selecting a version other than that currently selected. Doing that will clears all tabs. However, user will still have access to all Reports and Tools as they are not quote specific.
Frozen quotes cannot be locked and thus cannot be changed in the "Fleet Summary" or "Fleet List" reports. Since they cannot be locked, multiple users can view the contents of the quote, concurrently.
6.2. Look & Feel
The fleet software is a windowing system. Some windows are shown as tabs that can be docked with the main window or that can be undocked and shown as separate windows. This allows user to concurrently view multiple windows. The windows are interconnected so changes in one window may cause changes in another window. The tabs can be docked in various positions inside the main window. Right click over a tab label shows all the options possible.
User saved data is shown in tables that can grow vertically as more data is entered; such as when entering new records in the “Input Vehicle” tab. Clicking the column header sorts the list in ascending or descending order of that column. Click and hold at boundaries of two columns allows the user to expand the column width and causing the width of all other columns to be reduced. User can copy the entire data in the table to an excel file by clicking a row or selecting the entire table contents with CTRL-A followed by CTRL-C. Then in a cell of Excel spreadsheet user can then click CTRL-V to paste the values in the spreadsheet. Certain tables such as those in the “Manual Premium” and “Fleet Premium” tab have shortcuts that can be access by right clicking over a selected row or multiple rows. For example shortcuts are given for populating a record or for deleting one or more records. Note, before a record(s) or table contents are deleted, the user will need to confirm the action requested.
6.3. Record Numbering
The records shown in the “Manual Premium” tab are machine assigned record numbers in increasing sequence as records are added. The record number shown in the “Manual Premium” tab identifies the same record with same record number in other tables such as “Fleet Premium” tab and the “Vehicle List”. The assigned record number for a record remains statics even if the information in the record is updated or if other records are added or deleted. These record number remain static even if the quote is copied. Deletion of records will create holes in the number sequence. User can re-sequence the record numbering for any quote by selecting Reorder option in the Quote Management popup.
It is possible for users to uniquely identify a record by inputting a VIN in the “Vehicle List” popup.
The “Manual Premium” tab is meant primarily to show the premium by coverage. Users can however move the mouse over a record number for a specific record to see popup showing the detail rating characteristics used to rate the vehicle.
7. Creating New Quotes
At the “Input Vehicle” tab, user may select an existing quote or may create a new quote. To create a new quote the user can click the “Quote Management” button or click the same from the menu bar Tools -> Quote Management to show the “Quote Management” popup. Please see section 16.5.11 for a complete description on the steps required to create a new quote.
7.1. Groups
All users are assigned to groups. Similarly all versions of rates are assigned to groups. Some groups can be superset of other groups meaning the superset group can access the quote of its group as well as those of the subset groups. However the subset group cannot access quotes assigned to the superset group. So a user assigned to a subset group cannot access quotes assigned to a superset or access rate versions assigned to a superset group.
At the time of creation of new quotes, if the user belongs to a group which is superset of other groups, user will be allowed to assign the group to one of the group listed, that is, quote can be assigned either as the user’s own group or to that of a subset group. Other users of the same group will be able to see such quotes. A user assigned to a subset group cannot access quotes assigned to a superset group to that user. Along with the group value is shown the corresponding version numbers for reference. To be consistent one of the entries for the group selected should have the version number equal to that selected in the version dropdown box
8. Premium Calculations
8.1. Input Vehicle Tab
Once logged on, the software defaults to the “Input Vehicle” tab. The heading of the main window will show the version number of the software and the name of the company licensing the software. In addition to the “Input Vehicle” tab being displayed, other heading of other tabs are visible such as the “Claims History” tab, the “Exposure History” tab , the “Table Information” tab. Also at the bottom of the screen is displayed the “Manual Premium”.
The “Fleet Premium” tab is not displayed until you have selected a quote. When no quote is selected all tabs contain no data to display and all items are disabled. Only after a quote is select are the items enabled for data input.
The user can optionally change the layout of the tab by clicking and holding the tab and moving it to an alternate location. The software will remember the new layout on start. Also the user has option of undocking the tabs so it possible to see input from all tabs concurrently.
For the list at bottom of some tab such those in “Vehicle List” report, clicking the heading sorts it ascending or descending. To sort on two or more columns, hold the control key while you click the desired columns to perform a combined sort.
Figure 2
Click the quote dropdown box to display existing fleet quote numbers. Selecting an existing quote number displays the following figure showing the “Input Vehicle” tab. Also note the “Fleet Premiums” tab is now visible. It is recommended when adding new records to keep hidden the “Fleet Premiums” tab to increase speed of the software. Changing the values in either the quote or version dropdown will take the software to display Figure 2 again.
Figure 3
Shown in the figure above is a row of buttons which are defined as follows:
Populate – this button become enabled when a record number has been selected in the record number dropdown. Clicking this button causes all the dropdown boxes such as province, vehicle etc. to become populated using data store in the vehicle record.
Update Record - this button become enabled when all the fields have been selected such province, units etc. Clicking this button deletes the record number identified and replaces it with a new record reflecting the characteristics in all the populated fields. The old record is removed from the “Manual Premium” tab and the new record is added. The record numbers are re assigned in increasing order. To track a specific record use the Unique ID field in the “Manual Premium” tab.
New Record - this button become enabled when all the fields have been selected such province, units etc. Clicking this button creates a new record which is displayed in the “Manual Premium” tab.
Delete – this button become enabled when a record number has been selected in the record number dropdown. Clicking this button causes the identified record number to be removed from the “Manual Premium” tab. The record numbers are re assigned in increasing order. To track a specific record use the Unique ID field in the “Manual Premium” tab.
In addition to these buttons the user can scroll down the list of vehicle records in the “Manual Premium” tab and right click the desired record to show a popup (see figure below). From the popup the user can select “Populate” to populate the fields above with information in the record or select “Delete” to delete the record or change the list to display certain records
RG Search – Opens a popup in which users can search for a rate group based upon the vehicle characteristics. More information on this in section 14.3.4. This popup can also be accessed from the menu bar under Tools. The button is placed on the “Input Vehicle” tab for convenience.
Quote Management – Opens a popup in which users can manage the existing quotes and create new quotes. More information on this in section 16.5. This popup can also be accessed from the menu bar under Tools. The button is placed on the “Input Vehicle” tab for convenience.
Show Fleet – Takes the user to the “Fleet Premium” tab. This is similar to selecting “Window” in the menu-bar than selecting “Fleet Premium” menu-item. If this is the first time the user is viewing the “Fleet Premium” tab for the specified quote or the user has changed data in any of the other tabs, upon the “Fleet Premium” tab display the indicated fleet modifiers will be recalculated along with the new fleet premium for each record and coverage in the tables.
Show Factor – The button is visible only when the “New Record” button is enabled after the user has provided all the necessary information to perform a manual premium calculation. Clicking the “Show Factor” button opens a popup which display all the factors used to calculate the manual premium. If the table in the popup is blank, the user can click the Update” button to refresh the table. The column header will specify the coverage while the row header will identify the type of factor in that row.
The type of factors are grouped and identified by group label prefix such as “Base”, “Endorse”, “and “Optional AB”. Row label identified as “_Total” contains the total premium for that record.
The following figure shows the values in the Record Number field.
Figure 4
The record number dropdown, list the record numbers which identify the records shown in the “Manual Premium” tab. Selecting a record number causes the “Populate” and “Delete” buttons.to become enabled. These buttons are explained in the paragraphs after Figure 3.
The Version field shows the version of the base rates and factors that will be used in calculating the manual premiums.

Figure 5
To generate manual premiums for a vehicle record, the user will input information in two steps. In first step the user will input the province and the vehicle. Entering these two pieces of information allows the software to reveal additional fields which are specific for this combination of province and vehicle selection. Please see Figure 8 for step 2. The following step 1 information will be required from the users:
Figure 6
In the Province field, users can input the province that the vehicles are operating in. The following provinces can be chosen:
· Ontario
· Québec
· Alberta
· New Brunswick
· Nova Scotia
· Newfoundland
· Prince Edward Island
· Yukon
· Northwest Territories
· Nunavut
· British Columbia
· Saskatchewan
· Manitoba
Each province is unique such that it may provide different types of coverage. Please refer to Appendix A for province and coverage information.
Also in step 1 the user is required to input the vehicle type as per following figure.
Figure 7
There are several types of vehicles that can be selected by the user:
· Private Passenger Automobile – CLEAR
· Commercial Vehicle
· Interurban Truck
· Private Passenger Motorcycles
· Snow Vehicles
· All Terrain Vehicles (ATV)
· Motorhomes
· Camper Units
· Camper Trailers
· Taxis
· Ambulances
· School Buses
· Public Buses
· Private Buses – Hotel, Golf and Country Club
· Private Buses – Used to Transport Employees
Once the province and vehicle have been select all the remainder fields are displayed in addition to those displayed in Step 1. User is required to provide inputs for all fields shown.
The following figure shows some values of the Class dropdown. The Class dropdown lists the applicable classes the user can select. Please refer to Appendix C for Class information.
Figure 8
The following figure shows some values of the Territory dropdown. The Territory field lists the applicable territories the user can select. Please refer to Appendix B for territory information.
Figure 9
8.2. MSRP
The following are all the field inputs required for vehicle type MSRP in Ontario.
Figure 10
8.3. CLEAR
The following are all the field inputs required for vehicle type CLEAR in Ontario. The main difference in field inputs between CLEAR and MSRP vehicle type is CLEAR has 4 rate group inputs while MSRP has 1 rate group input
Figure 11
8.4. Commercial
The following are all the field inputs required for vehicle type Commercial in Ontario. The main difference in input between Commercial and MSRP vehicle type is that Commercial has an extra field for “Trailer Type”. The values in this field are:
Without Trailer: Vehicle comprising of the pulling unit- engine only.
Trailer Non-Cargo: Trailer units which DO NOT supplement the load capacity of the vehicle. These units have special purposes and functions such as welding units, tar pots, compressors, etc.
Trailer Cargo: Trailer units which DO supplement the load carrying capacity of the vehicle. A Semi- Trailer is a trailer attached to the power unit by a pin or fifth wheel.
Trailer Converter Dolly: A dual wheeled axle with a fifth wheel mounted and a tongue for attachment to a lead or straight truck.
Trailer Other: All trailers other than what is listed above.
Figure 12
8.5. Interurban
The following are all the field inputs required for vehicle type Interurban in Ontario. The main difference in field inputs between Interurban and Commercial vehicle type is that it has no assigned rating territor:
Figure 13
8.6. Motorcycle
The following are all the field inputs required for vehicle type Motorcycle in Ontario. The field input specific to this vehicle type is Engine CC and Age.
Motorcycle - A self-propelled vehicle having a seat or saddle for the use of the driver and designed to travel on not more than three wheels in contact with the ground, and includes a motor scooter, mini-bike and an all terrain cycle. This category includes vehicles of similar design having four wheels.
CC - The engine piston displacement in cubic centimeters.
Moped - A bicycle having an attached motor driven by electricity or having a piston displacement of not more than 50 cubic centimeters and which does not have sufficient power to enable the bicycle to attain a speed greater than 50km/h (31 mph).
Age – Age of the principal operator.
Figure 14
8.7. Snow Vehicle
The following are all the field inputs required for vehicle type Snow Vehicle in Ontario.
Figure 15
8.8. ATV
The following are all the field inputs required for vehicle type ATV in Ontario. The main difference in field inputs between Snow Vehicle and ATV vehicle type is that the latter is categorized into Medium and Heavy engine displacement. The engine displacement of Medium is up to 250 c.c. and horsepower not exceeding 25 h.p, otherwise it is defined as Heavy.
Figure 16
8.9. Motorhome
The following are all the field inputs required for vehicle type Motorhome in Ontario. The field input specific to this vehicle type is Price which represents the vehicle’s MSRP.
Figure 17
8.10. Camper Units
The following are all the field inputs required for vehicle type Camper Units in Ontario. The field inputs are the same as those for Motorhome.
Figure 18
8.11. Camper Trailers
The following are all the field inputs required for vehicle type Camper Trailers in Ontario. The field inputs are the same as those for Motorhome.
Figure 19
8.12. Taxis
The following are all the field inputs required for vehicle type Taxis in Ontario. The field inputs specifics for this vehicle type is whether or not the vehicle is exclusively owner operated and the liability limit for Passenger Hazard Property Damage

Figure 20
8.13. Ambulances
The following are all the field inputs required for vehicle type Ambulances in Ontario. The field inputs specifics for this vehicle type is whether the vehicle is for public or private use or for emergencies and it has liability limit for Passenger Hazard Property Damage.
Public (Emergency / No Emergency): An automobile used in the business of carrying persons requiring medical attention or under medical care, and that is designed and constructed or equipped for that purpose.
Private: An automobile used for transporting employees requiring medical attention or other medical care, and that is designed and constructed, or equipped for that purpose.
Figure 21
8.14. School Bus
The following are all the field inputs required for vehicle type School Bus in Ontario. The field inputs specifics for this vehicle type is the number of seats, the MSRP, the distance of operation and the liability limit for Passenger Hazard Property Damage.
Figure 22
8.15. Public Bus
The following are all the field inputs required for vehicle type Public Bus in Ontario. The field inputs specifics for this vehicle type is the number of seats, the MSRP, the distance of operation and the liability limit for Passenger Hazard Property Damage.
Public Bus: An automobile used in the business of carrying passengers along a designated route upon public streets or highways, or on sightseeing trips or outings other than those coming within the definitions of School Bus; or Hotel, Golf, or Country Club Bus.
Figure 23
8.16. Employee Bus
The following are all the field inputs required for vehicle type Employee Bus in Ontario. The field inputs specifics for this vehicle type is the number of seats, the MSRP, the distance of operation and the liability limit for Passenger Hazard Property Damage.
Private Bus – An automobile used for transporting employees or operated by an association, church, charitable, or similar organization.
Figure 24
8.17. Golf
The following are all the field inputs required for vehicle type Hotel and Golf Bus in Ontario. The field inputs specifics for this vehicle type is the number of seats, the MSRP, the distance of operation and the liability limit for Passenger Hazard Property Damage.
Hotel, Golf, or Country Club Bus: An automobile used in connection with the business or activities of a hotel, golf, or country club.
Figure 25
8.18. Optional Benefits
The following figure shows the optional benefit fields.
Figure 26
Only certain combination of province and vehicle type selected causes the display of optional items as shown in Figure 26. The premiums for some of these optional items are shown in the “Input Vehicle” tab as well as under separate fields in the “Manual Premium” tab.
Optional Discounts – User can select as many discounts as applicable. The by coverage premium reflects the discount selected.
Optional Endorsements – User can select as many endorsements as applicable. Some endorsements generate premiums. The total premium over all endorsements is shown in the box to the right.
Optional Surcharges – User can select as many surcharges as applicable. The by coverage premium reflects the surcharge selected
Optional Accident Benefits – User can select as many surcharges as applicable. The total premium over all surcharges is shown in the box to the right.
9. Manual Premium Tab
At the bottom of the screen displays the list of records (see figure below) containing vehicle records and their respective premium by coverage. Use the horizontal scrollbar to view columns not visible.
Figure 27
10. Claims History Tab
The following figure shows the “Claim History” tab in which the user can input the incurred claim amount and claim count as shown in the following figure. The development to ultimate value, the trending to future periods and adjustment for Maximum Single Loss (MSL) is handled by the software and is used in the calculations of the fleet modifier.
The user will need to input the specific of the claims. That is in what province was it incurred, for what type of vehicle, for which coverage and when was it incurred. Given it may be difficult to ascertain such specifics for all claims incurred, user can select unknown. In addition for coverage the user can group coverage into mandatory or physical damage etc.
For each claim record generated, software will show the MSL value for reference purposes.
User can select the province in which the claim was incurred or select unknown. See figure below for list of province.
Figure 28
User can select the vehicle type for which the claim was incurred or select unknown. See figure below for list of vehicles.
![]()
Figure 29
User can select the coverage for which the claim was incurred. If this information is not available the user can select unknown, mandatory coverage, physical damage coverage.
Figure 30
User can select the accident period over which the claim was incurred. For example, the entry “1.0 – 2.0 Years Prior” represents a claim that was incurred 12 month prior to the effective date but no later than 24 months prior to the effective date.
Figure 31
Shown in the figure below is row of buttons:

Figure 32
Populate – this button become enabled when a record number has been selected in the record number dropdown. Clicking this button causes all the dropdown boxes such as province, vehicle etc. to become populated using data store in the vehicle record identified by the record number shown.
Update Record - this button become enabled when all the fields have been selected such province, units etc. Clicking this button deletes the record number identified and replaces it with a new record reflecting the characteristics in all the populated fields. The old record is removed from the list and the new record is added. The record numbers are re assigned in increasing order. To track a specific record use the Unique ID field in the list.
New Record - this button become enabled when all the fields have been selected such province, units etc. Clicking this button creates a new record which is displayed in the list.
Delete – this button become enabled when a record number has been selected in the record number dropdown. Clicking this button causes the identified record number to be removed from the list. The record numbers are re assigned in increasing order. To track a specific record use the Unique ID field in the list shown.
In addition to these buttons the user can scroll down the list and select the desired record. Right click on the selected records displays a popup menu in which the user can select “PopulateClaims” to populate the fields above with information in the record or select “Delete” to delete the record or change the list to display certain records
The figure below show a fully populated claim record:

Figure 33
11. Exposure History Tab
The following figure shows the “Exposure History” tab in which the user can input the number of units of vehicle written in each period. For example, the entry “1 – 2 Years Prior” represents the time period spanning 12 month prior to the effective date but no later than 24 months prior to the effective date.
Figure 34
User can enter different written vehicle count by coverages, namely, Mandatory, Collision, Comprehensive, All Peril and Specified Perils. Mandatory coverage includes the coverages of TPL, BI, PDT, PDDC, Section A, Accident Benefits, and Uninsured Automobile.
Shown is the “Commission In Rate” in the manual premium. “Commission Prescribed” text box contains the prescribed commission for the “usersgroup”. The user can change the commission level which will be reflected in the indicated modifier and corresponding indicated fleet premium. For example a reduction in commission will decrease the Indicated Fleet premium. The textbox with heading “Deviation” is not directly editable but can be populated with deviation generated in the U/W Scoring Report. A positive deviation value will increase the indicated Fleet premium while a negative value will decrease the indicated Fleet premium. More detail can be found in the section 16.1 on U/W Scoring Report.
The Client Name, Underwriter and Quote Number fields are not editable. These values were setup at time the quote was created. Users can input the effective date, record date and any comments. Once the quote has been bound the user can input the insurer assigned policy number in the Policy Number field.
In order for a fleet premium to be calculated user must select “Number of Prior Period”. This represents the number of years of experience data that will be used in the calculation of the fleet premium. If a claim has been inputted in the “Claims” tab in a period that lies outside of the period selected here, that claim will not be used in the fleet modifier calculation.
The software assumes the vehicle counts are written at the beginning of the period for 12 month effective period. Earned vehicle count is taken as the average vehicle count over two consecutive periods. For example entering no historical written vehicle count still generate an earned vehicle count in the fleet modifier calculation as it takes the average of written vehicle over period 0 -1 and the current period.
Beside the period dropdown are some buttons.
Interpolate – fills in missing values.
Show input – remove an previously calculate interpolated values over the period selected.
Reset – clears all input over the specified period enter in period dropdown.
The following figure shows the “Table Information” tab.
Figure 35
This tab shows information for reference purposes. In it is stored the effective date of the latest version of rates, the minimum and maximum modification limits allowed to the logon user and some information on the search table available.
12. Fleet Premiums Tab
The following figure shows the “Fleet Premium” tab.
Figure 36
Upon entering the tab, the fleet premium is calculated based upon input from all other tabs.
Moving away from the fleet premium tab and back will not cause a recalculate in fleet premium unless something has been changed in another tab or popup window. Items in blue can be edited by the user.
User can enter values in the “Final Fleet Premium” row or enter percentages in the “Final Modifier Change” row which will cause the value in the other cell to be updated accordingly. If the Final Fleet Premium has been input for a coverage that value will remain fixed even if other values in the table are updated. For example if the user edits the final premium for a specific coverage and then later adds a brand new vehicle the indicated premium for that coverage will change while the final premium will remain fixed. . Similarly, if the user inputs a Final Modifier Change for a coverage that value will remain fixed even if other values in the table are updated. This is the default state and is the state achieved after pressing the Reset Credit button. Each coverage can be placed into one of these two states.
The user can also change the Final Fleet Premium and Final Modifier Change to the values under Total Coverage. Entering a Final Modifier Change under Total Coverage propagates that value for each coverage. Entering a Final Fleet Premium under Total Coverage causes corresponding Final Modifier Change to be calculated and to be used to calculate the Final Fleet Premium for each coverage.
Although the user can enter the “Final Fleet Premium” for any coverage or for all coverages combined the actual value stored will reflect the by coverage total of the dollar rounded values over all records. This value may be slightly different from what the user has input.
To the indicated and final fleet premium, rules can be incorporated to restrict the premium to remain between a specified ceiling and floor value. These restrictions can be applied to all quotes for all users or to quotes of a specific user and will apply to value internally generated or user supplied.
Indicated Modifier – represents the modifier calculated by the software.
Final Modifier – represent the modifier reflecting the user input value for the Final Fleet Premium.
Current Manual Premium – is equal the total manual premium as shown at the top of the “Manual Premium” tab.
Indicated Manual Premium – is the product of the Current Manual Premium and Indicated Modifier.
Final Fleet Premium - is the product of the Current Manual Premium and Final Modifier. If the user has input a Final Manual Premium, the software calculates the implied Final Modifier which when multiplied with the Current Manual Premium results in the Final Fleet Premium.
Final Premium Change – Is the ratio of the Final Premium and Indicated Premium.
Final Modifier Change – Is the ratio of the Final Modifier and Indicated Modifier.
Reset – reset the Final Modifier to equal the Indicated Modifier.
The Final Modifier is use to adjust the each record show in the “Manual Premium” tab and to generate corresponding records as shown in the bottom of the “Fleet Premium” tab.
The figure following shows the fleet premium at the bottom of the “Fleet Premium” tab.

Figure 37
The figure following shows the manual premium in the “Manual Premium” tab.

Figure 38
In the “Fleet Premium” tab the user is able enter the Final Premium or Final Modifier Change by coverage. This forces the fleet premium by coverage to acquire a uniform change from the manual premium for each vehicle groups. To refine the fleet premium change in order to vary the fleet premium change by province grouping or vehicle grouping or both click the “Refine Modifier” button. In this popup user can assign a specific fleet premium change or dollar amount for a specific vehicle province combination.
The figure following shows the “Adjust Modifier” popup.
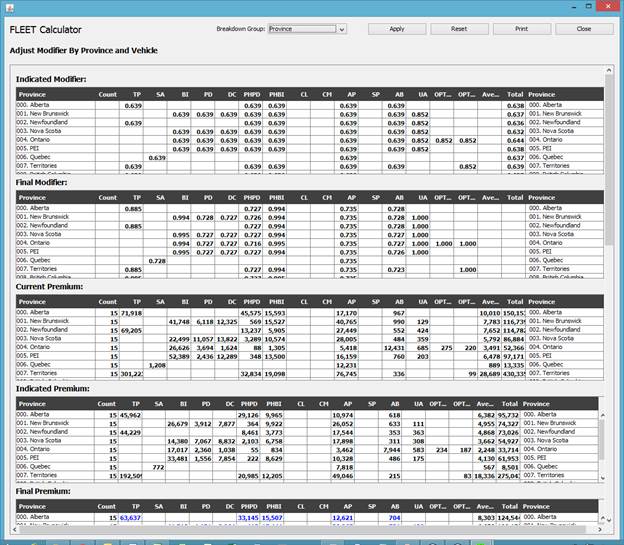
13. Figure 39
13.1. Deviation Cap
The following provides examples of the rules to restrict the machine generated or user requested credit or debit:
To limit the maximum credit assigned to a fleet, a rule can be built-in the software to allow no more than 25% credit in total as well as to each of Scoring Deviation, Experience Deviation and User Deviation. This implies that if the Scoring Deviation is -10% and Experience Deviation is -10% then the user will be allowed to enter a credit of no more than 5%. Another example is, if the Scoring Deviation is +10% and indicated Experience Deviation is -30% then the user will not be allowed to enter any credits. Furthermore the indicated Experience Deviation will be capped to -25%. No cap has been place on the Expense Deviation or the Commission deviation and the full impact will be reflected in the fleet premium. Each of these types of deviations are shown in the “Fleet Summary” popup. Also the manual premium and final premium shown here will be consistent with those shown in the “Manual Premium” and “Fleet Premium” tabs.
The existence of a 25% cap does not necessarily imply all fleet quotes could be potentially given a 25% credit. As per the second example with a Scoring Deviation of +10% and capped Experience Deviation of -25%, the maximum credit will be 15% (=10%-25%). In another example assuming no impact from the built-in caps, if the user wants to give a 10% credit from the calculated manual premium, he can enter in “Fleet Premium” tab under the column total the final premium set to an amount equal to 90% of the manual premium.
14. Menu Bar
The menu bar allows use access various reports and tools.
14.1. File
The following shows the menu-items under menu File:
Figure 40
Login/Out – User to logout and show the login popup.
Print – User can print the currently activated tab.
Exit – Exit the software. This can also be achieved by clicking the x in the top right of the screen.
14.2. Reports
The following shows the menu-items under menu Reports:
Figure 41
14.2.1. Vehicle List:
Report summarizes for a single quote the vehicle characteristics and premiums for each vehicle record within the quote. Users are allowed to input and save text that describes the quote only if the user has a lock on the quote (that is user is currently editing the quote). See Figure 44.
14.2.2. All Fleet Summary:
Report summarizes the fleet premium and fleet modifier assigned by various characteristics over all fleet quotes. User can use this report to determine the average fleet modifier assigned to a given group of quotes and manage the writing of such quotes and/or the assignment of fleet modifiers. See Figure 46.
14.2.3. Fleet Summary:
Report summarizes for a single quote the manual premium and fleet premium and provides the breakdown of the factors used to convert manual premium to fleet premium. Users are allowed to input and save text that describes the quote only if the user has a lock on the quote (that is the user is currently editing the quote). See Figure 47.
14.2.4. Submission Log:
Report allows for the entry of quote details such as date received, insured named, current insurer etc. See Figure 48.
14.3. Tools
The following shows the menu-items under menu Tools:
Figure 42
14.3.1. U/W Score:
A simple tool that provides a percentage score on the provided underwriting criteria. User may use this score to determine whether or not to write a quote or the amount to adjust the fleet premium indicated. See section 16.1.
14.3.2. Calculate DR:
Allows user to enter various information such as license date and conviction dated to generate the principal operator’s driving record number. See section 16.2.
14.3.3. Grid Premium:
In the calculation of manual premium for private passenger rate in the province of Alberta it is necessary to calculate the grid premium. In general the assigned manual premium for the risk is the lower of the grid premium and company premium. See section 16.3.
14.3.4. Rate Group Search:
Provides the rate group of the physical damage coverages based upon user provided vehicle characteristics or vin. Also contained therein is the search for rating territory based upon postal code input. See section 16.4.
14.3.5. Quote Management:
Allows user to manage fleet quotes. Fleets can be created, deleted, copied, rerated, outputted, inputted, frozen, hidden, re-ordered, unlocked and locked. Note Quote dropdown will contain labels showing in the record; the quote number, its version number and insured name. See section 16.5.
14.4. Window
The following shows the menu-items under menu Window:
Figure 43
User can click a tab to activate or can click the x next to the tab name to close it. User can also activate a tab by selecting the tab name from the window menu whether or not the tab is visible or not. It is recommended when adding records in the “Input Vehicle” tab to close the “Fleet Premium” tab in order to increase the speed of the software.
14.5. Help
The following shows the menu-items under menu Help:
Figure 44
About - will open a popup showing some details about the Fleet Calculator and contact information.
User Manual - will open this document in a browser window.
15. Reports Details
All the reports can be accessed from the menu-bar under menu-item “Reports”.
15.1. Vehicle List:
This report summarizes for a single quote the vehicle characteristics and premiums for each vehicle record within the quote. Users are allowed to input and save text that describes the quote only if the user has a lock on the quote (that is, the user has currently selected the same quote in the “Input Vehicle” tab). The fields that are editable will have a light blue background color.
At the top of the report, users can select the quote as well as whether they want to display the fleet premiums in the report or the manual premiums. The data in the report is linked to data in the tabs. Any input of data or automatic fleet calculation in the tabs will cause a refresh of the report and any unsaved data will be lost. Similarly clicking the save button on the report will cause the data in the tabs to refresh upon user activation of those tabs.
By default the report can show at most 8 lines of data which 8 vehicle record if all records require only a single line to display all its contents. If the quote has more than 8 lines the report will unhide buttons to move to the next page to show the next 8 lines. To show more or less lines the user can stretch or compress the borders of the window. Doing so will cause more or less lines to be shown.
Users can click “Print” to print the report screen showing. The row containing dropdowns and buttons on the top will become hidden for printing.
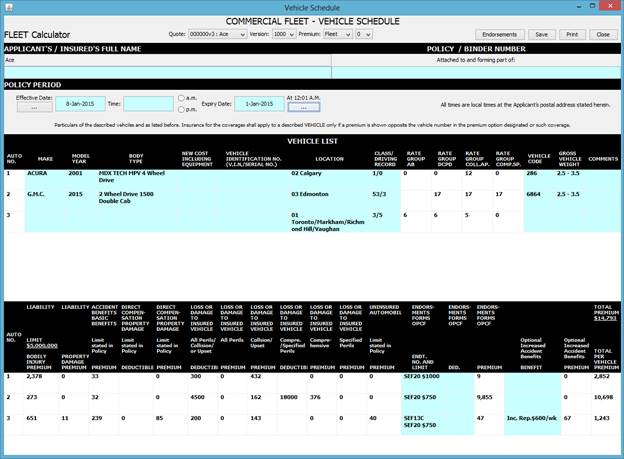
Figure 45
15.2. All Fleet Summary:
This report summarizes the fleet premium and fleet modifier over all fleet quotes. User can use this report to determine the average fleet modifier assigned to a given group of quotes and manage the writing of such quotes and/or the assignment of fleet modifiers.
Users can click “Print” to print the report screen showing. The row containing dropdowns and buttons on the top will become hidden for printing.
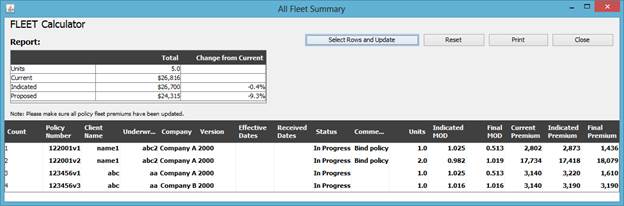
Figure 46
15.3. Fleet Summary:
This report summarizes for a single quote the manual premium and fleet premium and provides the breakdown of the factors used to convert manual premium to fleet premium. Users are allowed to input and save text that describes the quote only if the user has a lock on the quote (that is the user has currently selected the quote in the “Input Vehicle” tab). The fields that are editable will have a light blue background color
At the top of the report, users can select the quote. The data in the report is linked to data input in the tabs. Any input of data or automatic fleet calculation in the tabs will cause a refresh of the report and any unsaved data will be lost. Similarly clicking the save button on the report will cause the data in the tabs to refresh upon user activation of those tabs.
Users can click “Print” to print the report screen showing. The row containing dropdowns and buttons on the top will become hidden for printing.
The final credit/debit (modifier minus unity) is broken down into its components. The percentage displayed have been calculated to be additive to sum up equal to the final credit/debit. Please see section 13 examples of the impact of restrictions on the deviation allowed and impact on the components shown in the table.
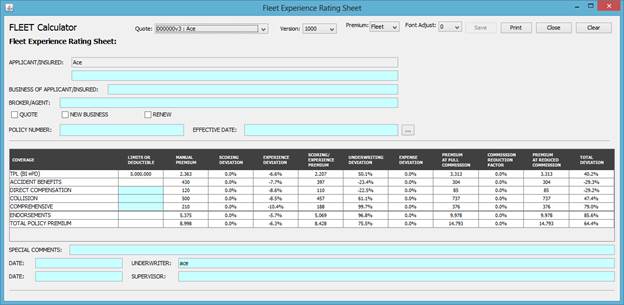
Figure 47
15.4. Submission Log:
Report allows for the entry of quote details such as date received, insured named, current insurer etc.
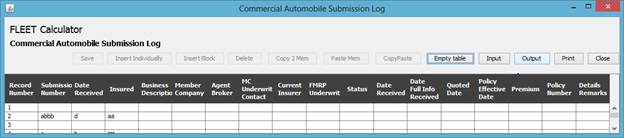
Figure 48
16. Tools Detail:
All the Tools can be accessed from the menu-bar under menu-item “Tools”.
16.1. U/W Score:
A simple tool that provides a percentage score on the provided underwriting criteria. User may use this score to determine whether or not to write a quote or the amount to adjust the fleet premium indicated.
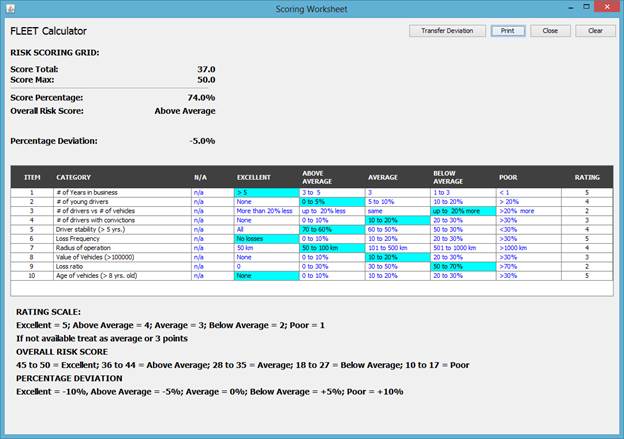
Figure 49
The popup opens with the calculated deviation set to “Not Rateable” Once the score exceeds a certain point the deviation is calculated and the “Transfer Deviation” button is enabled allowing the user to transfer the deviation to the “Input Exposure” tab.
16.2. Calculate DR:
Allows user to enter various insured information such as license date and conviction dated to generate the principal operator’s driving record number. This value may be used to fill in the driving record number in the “Input Vehicle” tab.
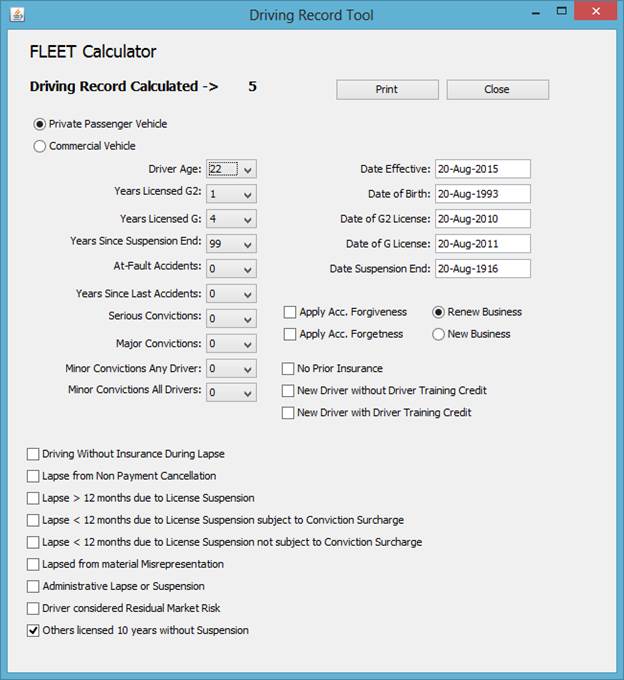
Figure 50
16.3. Grid Premium:
In the calculation of manual premium for private passenger rate in the province of Alberta it is necessary to calculate the grid premium. In general the assigned manual premium for the risk is the lower of the grid and company premium.
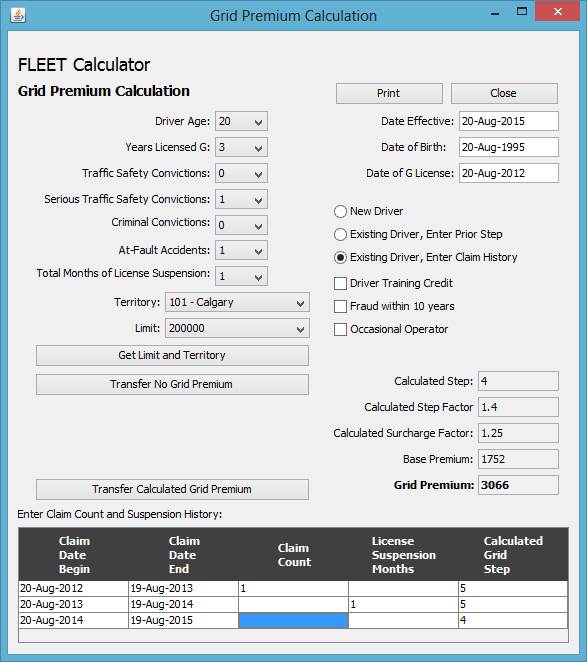
Figure 51
16.4. Rate Group Search:
Provides the rate group of the physical damage coverages based upon user provided vehicle characteristics or vin. Also contained therein is the search for rating territory based upon postal code input.
The following shows the list of tables upon which to perform a search.
Figure 52
|
Figure 53 |
Figure 54 |
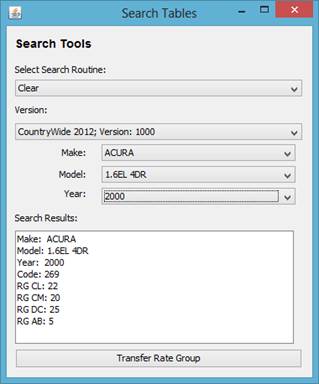
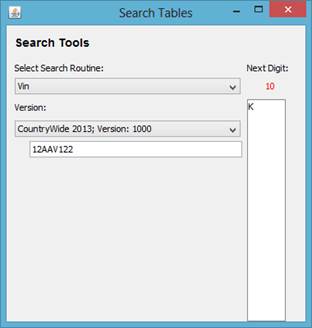
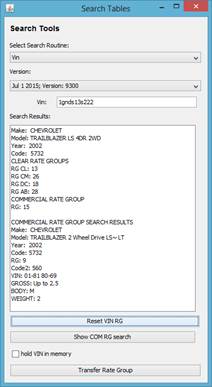
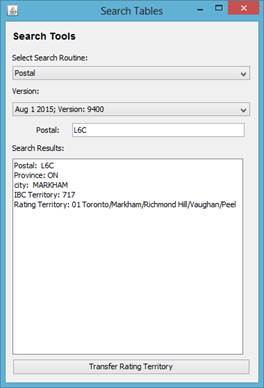
Figure 55
The figure on left shows the search result for a CLEAR rate group. The figure on right shows the search tool in process of inputting the vin digits. Once the digits have been selected the rate group associate with the vin is displayed. User can click the ”Transfer Rate Group” button at bottom to populate the rate group dropdown box on the “Input Vehicle” tab. Also transferred is the make and model information which is used to populate the “Vehicle List” report.
If the rate group search is performed on VIN table resulting in the Search Results showing the make and model and rate groups of the vehicle, a checkbox appears which allows the user to hold the vehicle description information in memory so that the user can assign rate groups based upon the Cash Value table.
16.5. Quote Management
The following popup is shown after selecting the menu-item “Quote Management”:
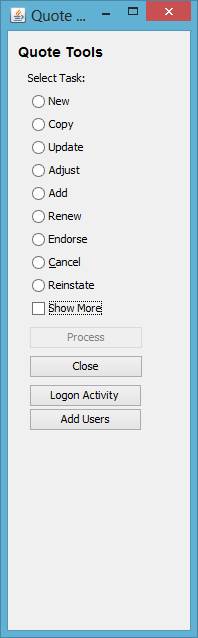

Figure 56
16.5.1. Output
Output a single quote created to an xml file. User to provide path and name of the file. Quotes that are locked cannot be outputted.
16.5.2. Delete
Delete an existing quote. A quote that has been marked as frozen, hidden or locked cannot be deleted. Unlock or unquote the quote first before deleting. In addition user has the option of deleting only the premium and claim records without deleting the quote.
16.5.3. Dump
Outputs all the quotes created to an xml file. User to provide path and name of the file.
16.5.4. Unlock
Unlock a locked quote. This may occurs if the software did not shutdown normally, leaving the quote locked. The user can either wait 30 minutes and the quote will be deemed to unused and will become unlocked or the user can unlock the quote selected using this screen. If the user unlocks a quote being used by another user and then starts editing that quote, any changes made by the two users will overwrite each other’s and will result in inaccurate fleet premium generated. Also locked quotes cannot be deleted.
16.5.5. Hide\Freeze
Freeze a quote so no further changes can be made. Upon user selecting the quote, the user will be notified that the quote has been frozen and cannot be edited. User will still be able to view all data entered in all the tabs and the fleet premium generated. Frozen quotes cannot be deleted.
In addition within the same option, user can hide the quote so it is not visible or accessible to any user in any report other than the “All Fleet Summary” report.
Frozen quotes cannot be locked and thus cannot be changed in the "Fleet Summary" or "Fleet List" reports. Since they cannot be locked, multiple users can view the contents of the quote, concurrently.
16.5.6. Unhide\Unfreeze
Unhide or unfreeze a quote so further changes can be made. Once the quote is unhidden or unfrozen any user can select this quote and lock it to make changes. Thus such quotes are regular quote and can be deleted.
16.5.7. Grouping
Selecting this option allows the user to view the grouping associated with a selected quote. Also it allows the user to redefine the user group to which the quote belongs. For example, this may be used if the quote has been created by a user belonging to one group and the user would like to make this quote accessible to another user in a different user group. Another example would be if the grouping is changed to a superset of the user group belonging to an administrator for review. Once changed, the original user will not be able to access the quote until the administrator changes the user group back to the original user group.
16.5.8. Reorder
Selecting this option allows the user to reorder the record number for the selected fleet quote into an increasing sequence starting from one. This is useful for those quotes in which record number other than the first and last have been deleted.
16.5.9. Input
User has the option of:
1) Selecting an xml input file containing information for a single quote. User to provide path and name of the file. The data in the file can be inputted to a target quote which can be a new quote or an existing quote.
2) Shifting forward the periods of the claims records. This may be useful if you are renewing a quote and want to reuse claims values by shifting them to a higher period.
3) Selecting whether to transfer premium records or claims records or exposure information into the target quote. User can select the format of the layout of the file being inputted.
4) Selecting whether the premium needs to be recalculated or not upon data transfer. Normally if the inputted file contains premium generated from the same version as the target quote, user should leave uncheck “Recalculate Premium” to speed up input. If the versions are different then it should than be checked. In any case it is still possible the inputted file has been manually changed and contains vehicle characteristics not understood by the software. Checking “Recalculate Premium” will allows the software to validate the data transfer. Invalid data will generate missing rating characteristics and the user will be informed to select a valid rating characteristic.
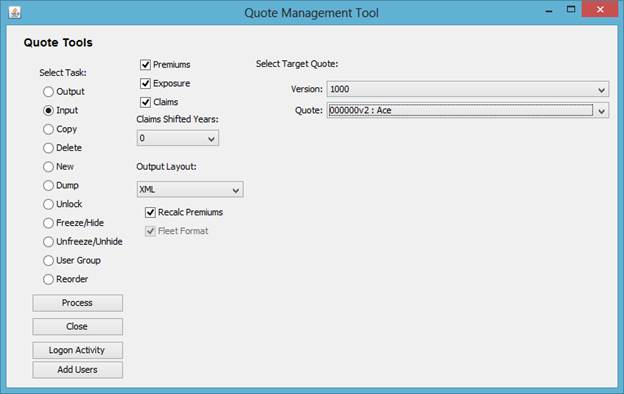
Figure 57
The following figure show data transfer with “Recalculate Premium” checked and the input record process has stopped as the input data had an invalid value for one of the field. In the example below it is the Class dropdown. In order to continue with the input process the user can either skip the record or provide the input to the missing field.
Figure 58
16.5.10. Copy
The following figure show the field inputs required to copy quote information from the source quote to the target quote.
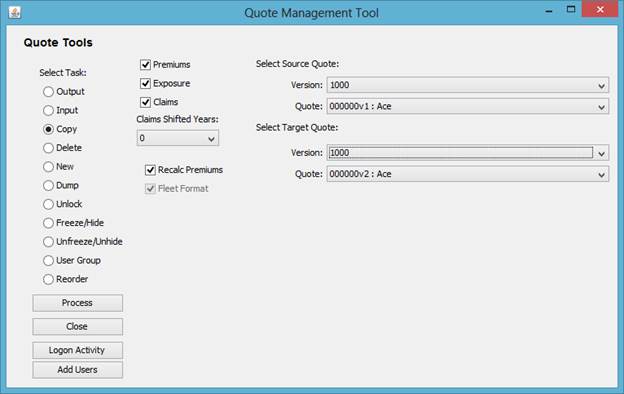
Figure 59
User has the option of:
1) Selecting a source quote and target quote. The source quotes can be frozen quote but not locked quotes. The target quotes cannot be either frozen or locked quotes. The target quote can be a new quote (see Figure 60) or an existing quote (see Figure 55).
2) Shifting forward the periods of the claims records. This may be useful if you are renewing a quote and want to reuse claims values by shifting them to a higher period.
3) Selecting whether to transfer premium records or claims records or exposure information into the target quote.
4) Selecting whether the premium needs to be recalculated or not upon data transfer. Normally if the inputted file contains premium generated from the same version as the target quote user should uncheck “Recalculate Premium” to speed up input. If the versions are different then it should than be checked. In any case it is still possible the source quote was inputted without the “Recalculate Premium“ option being checked and may contains vehicle characteristics not understood by the software. Checking “Recalculate Premium” will allows the software to validate the data. Invalid data will generate missing rating characteristics and the user will be informed to select a valid characteristic.
5) Fleet Format checkbox will be visible but disabled to allow user to identify the target quote as either Fleet Rated or Individually Rated.
The following figure show the field inputs required to create a new version of the source quote.
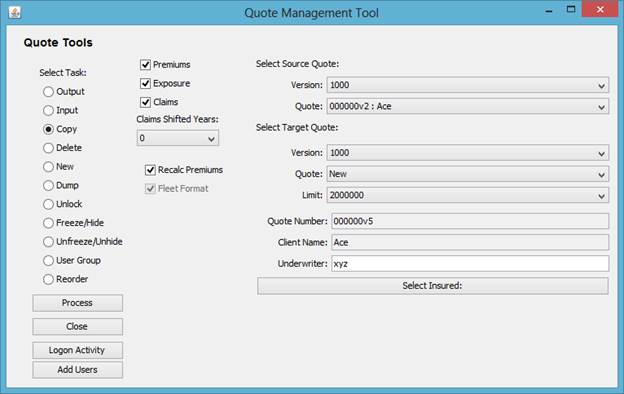
Figure 60
16.5.11. New
Create a brand new fleet.
Input the Version, to specify the version of the base rates and factors to use in the calculation of manual premiums. Input the Limit to reflect overall liability limit. Input the Underwriter name. Input the quote number and Client Name using the Select Insured popup (see next section). All fields must be filled before the Process button becomes enabled. That is, make sure to provide input to the Limit dropdown and fill in the underwriter’s name. Clicking the enabled Process button creates the specified new fleet quote. The “Input Vehicle” tab will show the newly created quote as selected ready for the first record to be added. You may close the “Quote Management” popup. See section 8.1 Input Vehicle for description on entering records.
If the user belongs to a group which is superset of other groups, user will be allowed to assign the group to one of the group listed as represented by their company names, that is, quote can be assigned either as the user’s own group or to that of a subset group. Other users of the same group will be able to see such quotes. A user assigned to a subset group cannot access quotes assigned to a superset group to that user. Along with the group value is shown the corresponding version numbers for reference. To be consistent one of the entries for the group selected should have the version number equal to that selected in the version dropdown box.
Not selecting Fleet Format checkbox will put the quote into Individually Risk Rated Software Format. This will restrict the tabs to only allow the display of “Input Vehicle” and “Manual Premium” tab and also to restrict vehicle type selection to those which are individually rated, thereby making the Fleet Calculator into and Individual Risk Rating Calculator. Selecting Fleet Format removes these restrictions. When copying data to individually rated quotes only the premium will be copied. The checkboxes to copy the Exposure or Claims and Fleet Format will be visible but disabled and unselected.
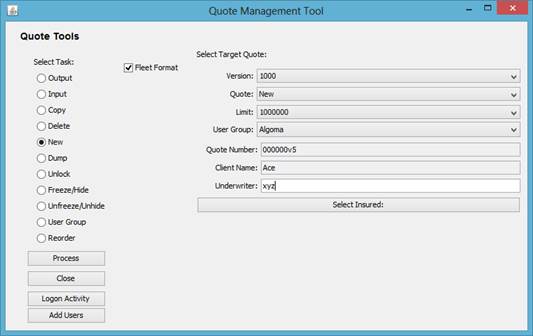
Figure 61
16.5.12. Select Insured
Opens a popup that allows user to select 1) an insured client listed or 2) to create a new client identifier. On return from this popup the client name and quote number is filled. The quote number selected is displayed as the quote number appended with a version number (for example v1). If the selected quote matches an existing quote that has been previously created, the version number provided is the next higher number. This allows for better management of multiple fleet premiums calculated on the same insured.
The following is the popup opens after clicking “Select Insured” button.
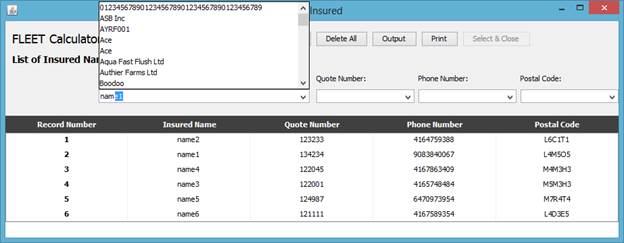
Figure 62
1) To select an existing insured, scroll down the list and click on the record. This will cause the selected record to populate in the dropdown boxes.
2) To create a new insured, enter the name, policy number, postal code and phone number in the given dropdown boxes in addition to other fields. Once all fields are filled, click the add button to add the quote to the list. The Add button will only be enabled if all the fields are filled and the entries in the fields do not match exactly to the corresponding fields in any record in the list. Given it is possible for an insured not to have a quote number assigned; this field can be left blank. User can continue to fill in entries for all the fields or select a record from the condensed list. If the condensed list contains no records this indicates the record has unique combination of all the fields and the user is allowed to add the record to the list. In addition the user can select a Client ID from the dropdown to overwrite the data of an existing record. It is recommended rather than entering unique quotes one at a time, it best to create the list externally and then import the insured list.
The buttons at the top such as Add, Delete, Clear, and Select & Close apply only to the values in the input field while Input, Output and Print applies to the entire insured list.
To close the popup without selecting anything click Clear followed by “Select & Close”, or click the X at the top right of the popup.
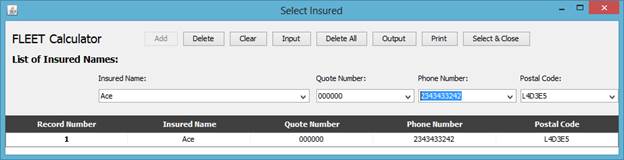
Figure 63
16.5.13. Logon Activity
Clicking the “Logon Activity” button shows the following popup.
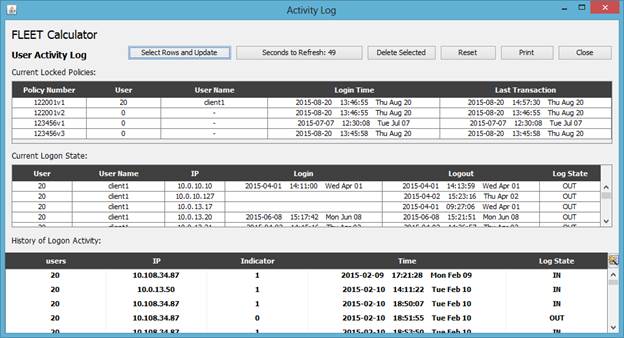
Figure 64
Under Current Locked Quote, all quotes are listed, only those currently locked have user names.
Under Logon State, for each unique user name and ip combination an entry is provided for the most recent login and logout date.
Under History of Logon Activity provide a history of each login and logout transaction which used to provide to populate the table above it.
16.5.14. Add Users
Clicking the “Add Users” button shows the following popup.
Once there setting the version to blank and named to Logon one can see the logon setting for every user. One can copy an existing record here and update the information for the name, password and authority level for a new user. For example, click a row and then click the “CopyPaste” button to get a duplicate row. Then update the name in Initvalue field, password in the Description field, blank in the Coverage field and provide a unique number in the Number field. Then click the encrypt button to have a new user. Note use the encrypt button only if the setting requires encrypted passwords.
Not only one can add and modify user information in this popup but one can modify any and all records in the Component table. The Component table contains the rates and factors that are used to calculate the manual and fleet premium. Caution should be taken when modifying this table. In addition updating the Named or Version field one can create new subset of the Component table that can be selected in the Named and Version dropdown box.
Also after updating the Component table one can click the “Create Hashmap” button to generate a file that has preloaded almost all possible queries that software does on the Component table. This file (also known as Internet Speed data) can be distributed to all users to speed up software performance. Note certain subsets such as Logon and Setup are not preloaded as these items can be modified at any time.
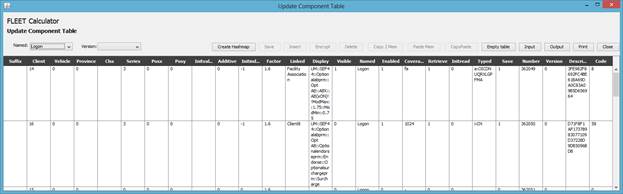
Figure 65
Appendix A
|
Coverage |
Ontario |
New Brunswick |
Nova Scotia |
PEI |
|
Third Party Liability (TPL) |
Bodily Injury (BI) |
Bodily Injury (BI) |
Bodily Injury (BI) |
Bodily Injury (BI) |
|
Property Damage – Tort (PD) |
Property Damage – Tort (PD) |
Property Damage – Tort (PD) |
Property Damage – Tort (PD) |
|
|
Property Damage – Direct Comp. (PDDC) |
Property Damage – Direct Comp. (PDDC) |
Property Damage – Direct Comp. (PDDC) |
Property Damage – Direct Comp. (PDDC) |
|
|
Accident Benefits (AB) |
Applicable |
Applicable |
Applicable |
Applicable |
|
Collision (CL) |
Applicable |
Applicable |
Applicable |
Applicable |
|
Comprehensive (CM) |
Applicable |
Applicable |
Applicable |
Applicable |
|
Specified Peril (SP) |
Applicable |
Applicable |
Applicable |
Applicable |
|
Uninsured Automobile (UA) |
Applicable |
Applicable |
Applicable |
Applicable |
|
Coverage |
Québec |
Alberta |
Newfoundland |
Yukon, NWT and Nunavut |
|
Third Party Liability (TPL) |
Section A |
TPL |
TPL |
TPL |
|
Accident Benefits (AB) |
N/A |
Applicable |
Applicable |
Applicable |
|
Collision (CL) |
Applicable |
Applicable |
Applicable |
Applicable |
|
Comprehensive (CM) |
Applicable |
Applicable |
Applicable |
Applicable |
|
Specified Peril (SP) |
Applicable |
Applicable |
Applicable |
Applicable |
|
Uninsured Automobile (UA) |
N/A |
N/A |
Applicable |
N/A |